PowerPoint is a powerful tool for creating and delivering presentations, but it can also be used to design engaging and dynamic animations, transitions, and object movements. One of the features that can help you achieve this is the Morph transition, which allows you to animate smooth movement from one slide to the next.
In this article, we will explain what the Morph transition is, how to use it, and some tips and tricks to make the most of it.
What is the Morph Transition?
The Morph transition is a feature that was introduced in PowerPoint 2016 and is available for Microsoft 365 subscribers and PowerPoint for web users. It enables you to create the appearance of movement in a wide range of objects, such as text, shapes, pictures, SmartArt graphics, and WordArt, across the slides in your presentation. However, charts cannot be morphed.
The Morph transition works by comparing the objects on two slides and automatically animating the changes between them. For example, if you have a picture on one slide and move it to a different position on the next slide, the Morph transition will create a smooth animation of the picture moving from its original location to its new one. You can also change the size, color, rotation, and other properties of the objects and the Morph transition will animate them accordingly.
The Morph transition can help you create stunning effects, such as zooming in or out of a picture, transforming shapes, revealing or hiding text, and more. You can also combine the Morph transition with other features, such as 3D models, icons, and ink annotations, to create even more impressive animations.
How to Use the Morph Transition?
To use the Morph transition effectively, you need to have two slides with at least one object in common. The easiest way to do this is to duplicate the slide and then move or modify the object on the second slide.
Alternatively, you can copy and paste the object from one slide and add it to the next. Then, you need to apply the Morph transition to the second slide and adjust the effect options if needed.
Here are the steps to use the Morph transition in PowerPoint:
In the Thumbnail pane on the left side, click the slide that contains the object that you want to animate with the Morph transition. This will be the first slide in the sequence.
Right-click the slide and select Duplicate Slide from the context menu. This will create a copy of the slide as the second slide in the sequence.
On the second slide, move or modify the object that you want to animate. For example, you can change its position, size, color, rotation, or other properties. You can also add or delete other objects on the slide, but make sure that the object that you want to animate is present on both slides.
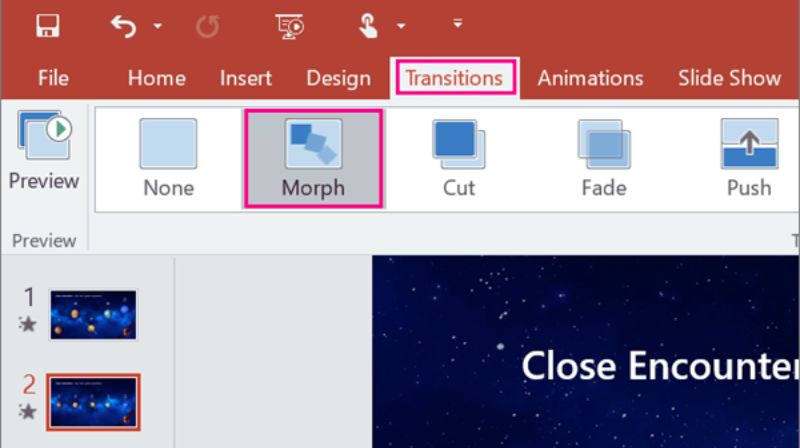
In the Thumbnail pane, click the second slide to select it.
Click the Transitions tab in the Ribbon and then select Morph in the Transitions Gallery.
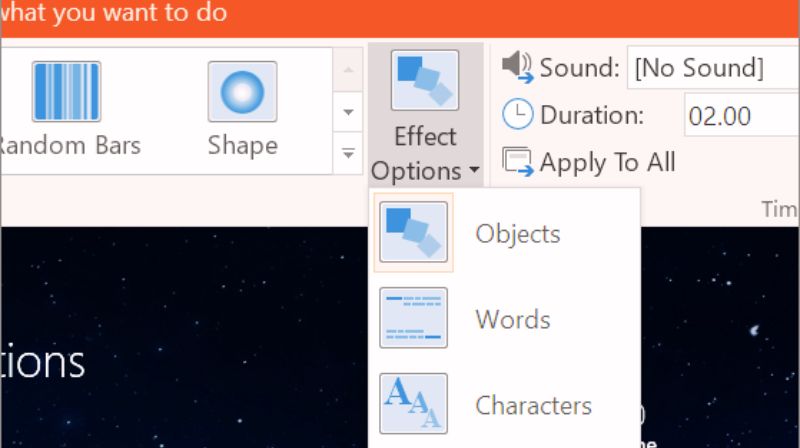
Click the Transitions tab again and select Effect Options. This will open a drop-down menu where you can choose how the Morph transition will work. You can select one of the following options:
-
- Objects: This is the default option and it will animate all the objects on the slide that have changed from the previous slide.
- Words: This option will animate the words and characters on the slide that have changed from the previous slide. This can be useful for text animations, such as revealing or hiding words, changing fonts, or spelling out words.
- Characters: This option will animate the individual characters on the slide that have changed from the previous slide. This can be useful for text animations, such as scrambling or unscrambling letters, changing colors, or rotating characters.
Click Preview to see the Morph transition in action. You can also adjust the duration and timing of the transition by using the options in the Timing group on the Transitions tab.

Repeat the steps above to create more slides with the Morph transition. You can create a sequence of slides with the same or different objects and apply the Morph transition to each slide to create a continuous animation.
Tips and Tricks for Using the Morph Transition
The Morph transition is a versatile and easy-to-use feature that can help you create stunning animations and transitions in PowerPoint. However, there are some tips and tricks that can help you make the most of it and avoid some common pitfalls. Here are some of them:
1. Use the Selection Pane to Manage Objects
The Selection Pane is a tool that allows you to see and select all the objects on your slide, such as text boxes, shapes, pictures, etc. You can access it by clicking the Home tab in the Ribbon and then selecting Arrange > Selection Pane.
The Selection Pane can help you:
- Ensure that the objects on your slides have the same name, order, and visibility, which are important factors for the Morph transition to work properly.
- Group or ungroup objects, lock or unlock objects, and show or hide objects.
2. Use the Align and Distribute Tools to Position Your Objects Precisely
The Align and Distribute tools allow you to align and distribute your objects on your slide, such as centering them, spacing them evenly, or aligning them to the slide or to each other. You can access them by clicking the Home tab in the Ribbon and then selecting Arrange > Align or Arrange > Distribute.
These tools can help you:
- Create smooth and consistent animations with the Morph transition, especially when you are moving or resizing your objects.
3. Use Guides and Grids to Snap Objects to a Specific Location
Guides and Grids are visual aids that help you position your objects on your slide, such as horizontal and vertical lines, or a grid of dots or lines. You can access them by clicking the View tab in the Ribbon and then selecting Show > Guides or Show > Gridlines. You can also customize the guides and grids by clicking the View tab and then selecting Guides > Grid and Guides.
Guides and grids can help you:
- Snap your objects to a specific location on your slide, making your animations more precise and accurate with the Morph transition.
4. Use the Zoom and Pan Tools to Focus on a Specific Part of Your Slide
The Zoom and Pan tools allow you to zoom in or out of your slide, or pan across your slide, by using the mouse wheel, the keyboard, or the Zoom toolbar. You can access the Zoom toolbar by clicking the View tab in the Ribbon and then selecting Zoom.
These tools can help you:
- Focus on a specific part of your slide, such as a picture, a shape, or text, and create a zooming or panning effect with the Morph transition.
5. Use the 3D Models Feature to Create Realistic and Immersive Animations
The 3D Models feature allows you to insert and animate 3D models on your slide, such as animals, buildings, vehicles, or people. You can access it by clicking the Insert tab in the Ribbon and then selecting 3D Models. You can also use the 3D Model Tools tab to modify and animate your 3D models, such as changing their color, size, rotation, or perspective.
The 3D Models feature can help you:
- Create realistic and immersive animations with the Morph transition, especially when you combine it with the Zoom and Pan tools.
FAQs
Q: What is the morph transition in PowerPoint?
A: The morph transition in PowerPoint is a feature that allows you to create seamless animations between slides. By using the morph effect, you can smoothly transition objects, text, and images, making your PowerPoint presentation more engaging.
Q: How do I use the morph transition in PowerPoint?
A: To use the morph transition in PowerPoint, you need to duplicate a slide and then modify the objects on the new slide. Ensure that at least one object is common between the two slides. Then, select the new slide, go to the “Transitions” tab in the PowerPoint ribbon, and choose the morph transition.
Q: Which versions of PowerPoint support the morph transition?
A: The morph transition is available in Microsoft PowerPoint 2016 and later versions, including Office 365. If you are using an older version, such as PowerPoint 2013 or earlier, you will not have access to this feature.
Q: Can I use the morph transition in Google Slides?
A: No, the morph transition is a feature exclusive to Microsoft PowerPoint. However, you can create similar effects in Google Slides by using animations, but it may not be as smooth or seamless as the morph transition in PowerPoint.
Q: What are some quick tips for using morph transitions effectively?
A: Some quick tips for using morph transitions include ensuring that you have at least one object in common between slides, using the “Effect Options” to customize the transition, and practicing with different objects to see how they animate. It’s best to keep your design simple and avoid overusing the effect to maintain clarity.
Q: How can I make my presentation more dynamic with morph transitions?
A: To make your PowerPoint presentation more dynamic, utilize the morph transition to elevate important points. Use it to animate text, images, and shapes, making complex concepts easier to understand. By applying morph transitions strategically, you can enhance the storytelling aspect of your presentation.
Q: What should I do if the morph transition isn’t working in my PowerPoint presentation?
A: If the morph transition isn’t working, ensure that you are using a compatible version of PowerPoint. Check that you have added morph to the transition options and verify that you’ve duplicated the slide with at least one object in common. Also, ensure that your presentation is in slideshow mode to view the transitions properly.
Q: Can I control the speed of the morph transition?
A: Yes, you can control the speed of the morph transition by adjusting the duration in the “Timing” group of the “Transitions” tab in the PowerPoint ribbon. You can set it to a specific time to create a quicker or slower effect based on your preference.
Q: Is it possible to add sound effects to morph transitions?
A: While PowerPoint allows you to add sound effects to individual slides and animations, the morph transition itself does not support sound. However, you can add sound to the slide before or after a morph transition occurs to enhance your presentation.
Conclusion
The Morph transition is a powerful and easy-to-use feature that can help you create stunning presentations in PowerPoint. It allows you to animate smooth movement from one slide to the next, and create the appearance of movement in a wide range of objects, such as text, shapes, pictures, SmartArt graphics, and WordArt.
You can also use the Morph transition with other features, such as 3D models, icons, and ink annotations, to create even more impressive animations. To use the Morph transition effectively, you need to have two slides with at least one object in common and apply the Morph transition to the second slide. You can also adjust the effect options and the duration and timing of the transition.
Moreover, you can use some tips and tricks, such as the Selection Pane, the Align and Distribute tools, the guides and grids, the Zoom and Pan tools, and the 3D Models feature, to make the most of the Morph transition and avoid some common pitfalls.